VMware vSphere Big Data Extensions Installation – 3

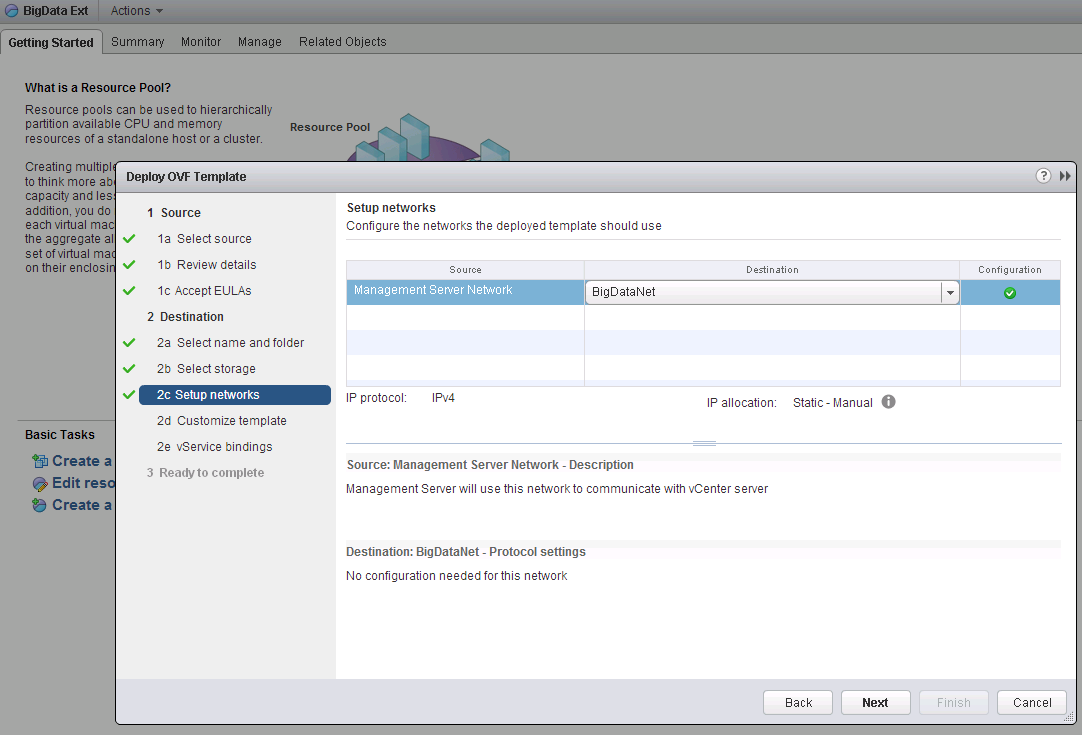
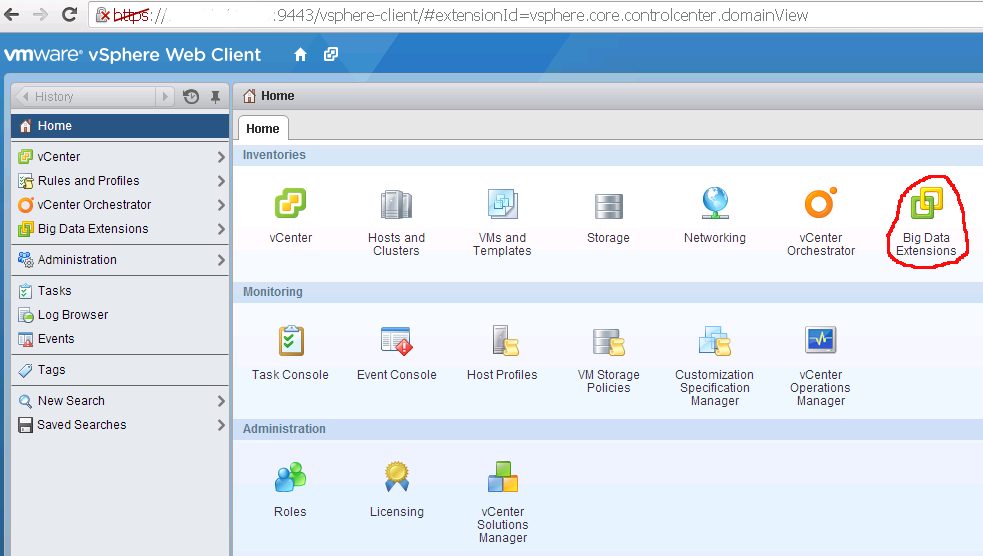
After deploying Serengeti Management Server using OVF, it would be possible to install Big Data Extensions plugin in vCenter Server. Follow the instructions for doing this. After a Logout and Login (necessary), you will see Big Data Extensions plugin in vSphere Web Client Home, Inventories.

bigD_plugin3

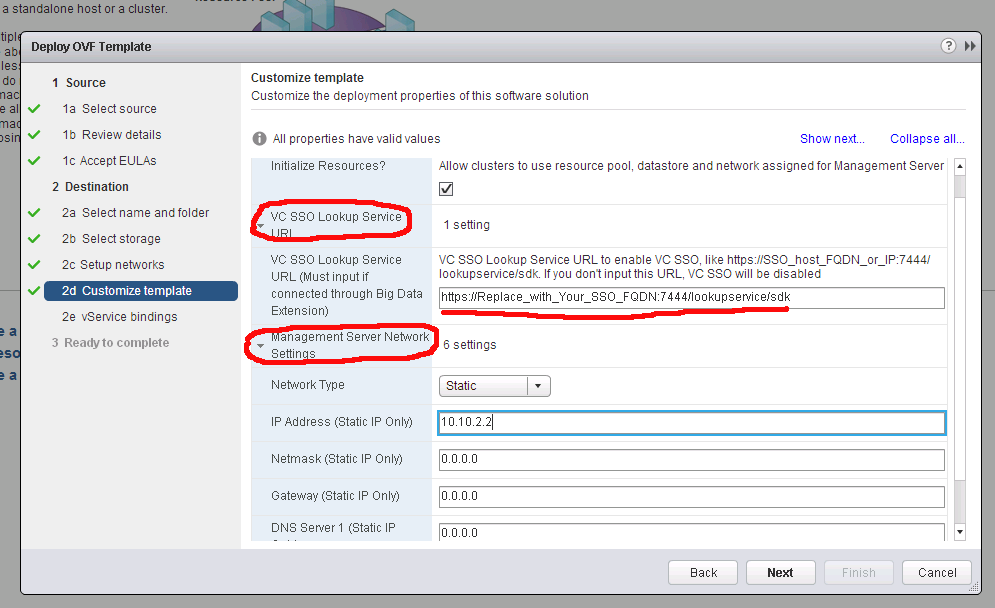
Next step is connecting Big Data Extensions plugin to Serengeti Management Server. For a successful connection, 2 conditions should be met: First, Serengeti Management Server should be reached by vCenter in terms of networking. Ping is not blocked by default, so vCenter should be able to ping Serengeti Server. Secondly, SSO Lookup Service URL should be correct. If it’s not correct, you will get an error like: “Connection failed! Check the server has enabled SSO.” If you are not sure if SSO URL is entered and works properly, try to re-enter SSO Lookup service URL manually:

Login to Serengeti server and issue these commands:

– sudo /opt/serengeti/sbin/EnableSSOAuth https://VC-FQDN:7444/lookupservice/sdk
– sudo service tomcat restart

In my case, I first got the following error:

“com.vmware.vim.vmomi.core.exception.CertificateValidationException: Server certificate assertion not verified and thumbprint not matched
Return code is: SslHandShakeFailed
Please check if sso lookup service https url is correct, and sso service work normally.”

The issue was that I entered URL by IP and certificate was generated using FQDN. So, I recommend using FQDN of vCenter and not IP address.

Also, check the time of Serengeti server to by synced with vCenter.

Advertisement

VMWARE VSPHERE BIG DATA EXTENSIONS INSTALLATION – 2

To install VMware vSphere Big Data Extensions 1.1, if you satisfy the requirements mentioned in vmware document, go ahead with installation by deploying Big Data Extensions OVA as documented. But attention that:

  • Better to create a specific Resource Pool for your Big Data Cluster and specify the total amount of resources you want to assign and apply possible limits.
  • Create a port group dedicated to Big Data Extensions  as a communication link between management servers and working VMs.
  • When deploying Big Data Extensions Management server (OVA), ‘setup networks’ asks you to assign a destination port group. Note that: Management Network will use this network to communicate with vCenter server. So, if you use VLAN tags, the port group should be in the same VLAN (use same VLAN id) with vCenter network. If vCenter can not see Big Data Management server and vice versa, integration will not be made properly.

bigD_plugin4

  • In ‘Customize template’ step, there are 2 important settings: SSO service and Management Server IP address. So, from right-pane open ‘VC SSO Lookup Service URL’ and ‘Management Server Networks Settings’. Enter appropriate values. For SSO Lookup Service URL, use vCenter server with the same format (if you didn’t change defaults), I mean port 7444/lookupservice/sdk. Use FQDN of vCenter and not IP address or certificate will not be accepted and you will see errors for connecting Big Data Extensions plugin to Serengeti server in the future.

bigdata_sso1

VMware vSphere Big Data Extensions Installation – 1

Nowadays Big Data is everywhere. Many are talking about it and they are enthusiastic to deploy a Big Data instance in their environments. Installation and deployment can be difficult though. The fact is that there is no official mature Big Data standard and lots of open source standards are being developed, sometimes independently. Even if we accept Apache Hadoop as the dominant standard of Big Data, implementing Hadoop is a big challenge for IT departments. For example, according to this article: In addition to the technical challenges of deploying large-scale Hadoop systems and applications, another issue Manor cited is that IT operations often work in silos, with separate teams handling systems administration, database administration, storage, networking, security and application development. That approach can lead to problems in managing Hadoop clusters.

And it’s exactly where Virtualization, Cloud and SDN can help: integrating multiple administration tasks in a unified control center. And VMware did this beautifully by putting together all required Hadoop components in a package to create Clusters and control and scale the Hadoop Clusters by using VMware vSphere Big Data Extensions. Hadoop clusters which are created by vSphere Big Data Extensions are scalable, elastic and flexible. You can easily separate compute and data nodes or increase the number of working machines and so on. vSphere Big Data Extensions utilizes the open source project Serengeti that was initiated by VMware to implement Hadoop on a virtual platform. Serengeti or better to say VMware vSphere Big Data Extensions deploys HDFS, MapReduce, Pig, Hive and HBase on vSphere infrastructure.

You can find general installation instructions here, but there are some implementation tips which will help in vSphere Big Data Extensions installation. In my upcoming posts I will show the required steps and important considerations during installation.

VMware vCloud Windows Customization Requirements

Sometimes you may notice that your customization of a VM fails when you provision VM from template or import it from vSphere; for example Computer Name may not be changed or IP address can not be assigned.

There are a couple of documents about troubleshooting guest operating system customization in VMware kb: for vCloud Director and vCenter. But none of them worked in my specific case, so I’m sharing something important in Windows OS’s. This hint will be useful especially when you see this error in: C:\Windows\Temp\vmware-inc\guestcust.Log:
“Command Execution failed with exist code: 1, output: ‘The service can not be started.’ ”

Since Windows administrators tend to disable some unnecessary services to harden security, we should know which services are necessary for VMware, if there is any. In fact, a number of Windows services should be enabled and started so that VMware customization works properly.  The necessary services are:

  • DNS Client
  • DHCP Client
  • Workstation
  • TCP/IP NetBIOS Helper

So, if you face the same issue, besides viewing Logs on VM, check these services as well.

vCloud Automation Center Installation – 2

Although as I said the vCAC installation guide by Kendrick Coleman is fairly complete, there is something that can be added. In part 4, item 4, I was able to get “Native Active Directory” working that is easier for assigning administrator to vsphere.local. Maybe because I’m using vCAC 6.0.1. But remember that Native Active Directory can be used only for default tenant. So, specifying default tenant administrator using Native Active Directory is as follows:

  • Click on vsphere.local and go to ‘Identity stores’, click on ‘+’ to Add Identity Store. Choose ‘Native Active Directory’ from Type drop-down menu. Now the only thing that should be defined is: Domain, the other fields would get grey/inactive. If everything goes well, the Active Directory domain will appear in Identity Stores list.

vcac_native_ad1

  • Then, go to Administrators tab and search for a specific user like ‘user@yourADdomain.com’. Do this for both Tenant Administrator and Infrastructure Administrator roles.

vcac_native_ad2

That’s all. Default tenant administrator is specified.

vCloud Automation Center Installation – 1

Installing VMware vCloud Automation Center is strongly recommended for the beautiful things that administrators or tenants can do. An example is deploying popular big data clusters using a very simple procedure (I will post a how-to soon for this). There is a perfect and comprehensive 7-part installation, configuration manual written by Kenny Coleman which can be found here.
So, if you didn’t deploy vCAC in your management environment yet, install and you will enjoy it!

p.s – I found Part 3 (Installing IAAS) of this guide the most difficult one. There are some hints that I would like to add:

  • To ease installation, don’t use external MS SQL server. Instead, install SQL Express 2012 on the same Windows machine (IAAS and Model Manager Server).
  • Make sure that DNS settings are correct and IAAS Server FQDN can be resolved.
  • If you don’t use Active Directory, YOU MUST specify domain name in Primary DNS suffix of System Properties to make computer full name like its FQDN. It’s very important that in Step 8, Current Server filled automatically with FQDN and not Stand-Alone Server name. Domain should be there. Or you will face with an error (in Logs) like:
    “Building Project “C:\Program Files (x86)\VMware\vCAC\Server\Model Manager Data\DeployRepository.xml” (VARegistrationFinalSteps target(s)) — FAILED.
    Build FAILED.
    Authentication issue
    ……
    this error occurs when either the username or password supplied to iis is invalid
    …..