NAT in Fenced vApps (vCloud Director)

An interesting feature in vCloud Director networking is the capability of creating a fenced vApp. Basically, it’s like having an extra  (in case you have one for Organization network which means routed) vShield router and firewall on the edge of vApp.

One of the coolest applications for fenced vApps is when you want to have identical machines (same IP and MAC) in your vDC; it means when you want to do a fast clone without customizing guest OS by changing IP’s and names, … In this case vApps are completely isolated while they can have connection to External networks or perhaps internet! See here for a how-to about creating fenced vApp.

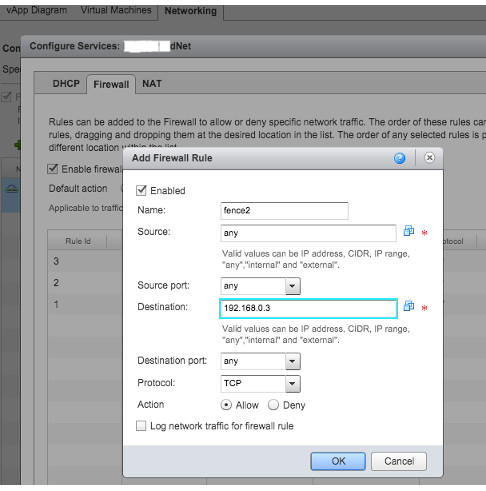
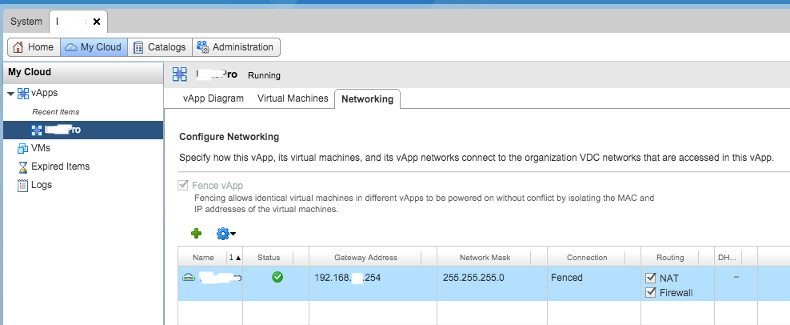
After you created a fenced vApp, you will notice that the IP addresses in the vApp are in the same subnet with Organization Network (see the picture above), although a NAT gateway is operating between the vApp and Organization network. So when you want to do a DNAT (Destination NAT), there are 2 places you should configure. In the picture above, suppose you want to give access to a VM with IP 192.168.0.45 in Fenced vApp from External Network. Assume that Edge 1 got IP 192.168.0.3 (specified while fencing). First, you need to create appropriate rules in Edge Gateway of Organization Network, Edge 2 (if there is any) to NAT and open ports for the IP address of Edge 1 (192.168.0.3)

fenced1

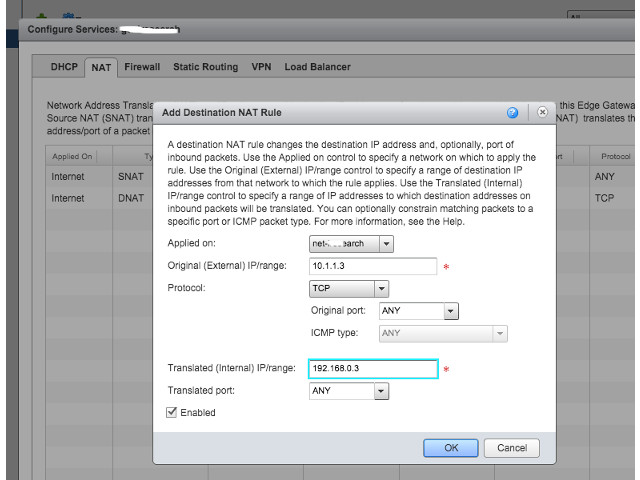
Next step, you need to do NAT and open ports from Edge 1 to specific VM but this configuration is not in Edge Gateways of vDC (unlike Edge 2) but can be found in Networking Tab of the vApp itself.
Click on the vApp, go to Networking tab,

fenced2

right click on the selected network and choose ‘Configure Services’. there, you can define appropriate NAT and firewall rules.

fenced3


VMware vCD Guest Customization for Debian

One of the great features in vCloud Director is client’s capability to customize general specifications of a VM. Specifications like Hostname and more importantly IP address(es). Customer can even have some scripts for more advanced customizations like joining to a domain, … All these depend on ‘Guest OS Customization’ feature that should be enabled on a VM. Not all the operating systems support ‘Guest OS Customization’. For a list of supported OS’s in vCD 5.x see these links:

Supported guest operating systems in vCloud Director 5.5
– Supported guest operating systems in vCloud Director 5.1

As you can see, there is no support for Debian Linux! What a pity! If you deploy a Debian and want to change its IP through VM Properties in vCD portal, it will give you an error:

“Guest customization is not supported by the selected OS. Please disable guest customization to proceed.”

Debian_custom

Debian is a great OS and many clients may get disappointed! But fortunately, there is a simple work-around for it: change the Operating System type to: Other Linux and Guest Customization will be fine! Of course, try to choose the closest kernel version, for example choose ‘Other 2.6.x Linux (64-bit)’ for a Debian wheezy with kernel 3.2.0-amd64.

Debian_custom2

By this change, modifying Hostname or assigning IP addresses, Gateway, DNS to Debian NICs would be possible like any other supported OS.

VPN access for vCloud Director Customers

Providing VPN access to vCD customers is a great idea, because usually customers are behind a vCloud created firewall and most likely you created a routed organization VDC network to connect them to external network. So, how they have to get access to their VDC? One approach could be to define different sets of firewall and NAT rules for required access ports (SSH, RDP, …) but when the number of VM’s grow, this would be less flexible but of course still doable. Even a customer can get access to only one VM and go through this single VM to access the others; however sometimes it’s not a simple remote access and remote user wants to do a more advanced task.

By the way, I don’t want to go into the details of benefits of having a VPN for remote clients but it seems like a very helpful facility for cloud customers. We can leave it to the user to install its own VPN server to tunnel through to get access to organization VDC network but VMware provides this excellent capability to setup VPN gateways in vCloud Director or vSphere Cluster. For a Site-to-Site IPsec VPN, VMware vCD is pretty much straight forward. So, if you have a VPN gateway in place, easily you can establish a tunnel between your local network and your organization network in the cloud. I found this guide about setting up an IPSec tunnel in vCloud Director with useful examples, one with a Cisco WAN router. Here is another guide for a Cisco PIX and vCD; although the vCD version is old (1.5) but it’s too similar in terms of VPN tunnelling.

However, if you don’t have a VPN endpoint in-place and still want to establish a secure VPN-connection with your vCD organization network as a remote user, VMware provides this brilliant SSL VPN utility. It’s not as straight forward as IPsec VPN and it’s not present in vCD web portal but it worths deploying (especially for customers). VMware SSL VPN should be configured in vCloud Networking and Security solution (which is a new name for vShield Manager).

I’m not writing a How-To for this here and a complete step by step guide can be found here, very well explained by Ranga Maddipudi. I just wanted to give some idea and as you can see, deploying a SSL VPN gateway is fairly easy and an installable file (.exe file for Windows) will be provided. To get this file, on the client side use should use the browser to download the file. The URL for downloading the package would be: https://external-ip-address-of-gateway:443
After getting the file, user can easily install the VPN client and that’s it.

SSL-VPN1

Running the application and entering the right credentials, VPN connection will be established and given that the configurations are server side are well defined, remote user will get access to VDC organization network in the cloud. In fact, what excites me is that from engineering point of view, VMware did a great job to ease the whole procedure of setup a connection on both server and client side; in specific, generating a custom designed VPN client using SSL (as authentication and encryption protocol) VPN is a brilliant idea.

SSL-VPN2

vCloud Director Resources Allocation

In vCloud Director (vCD) 5.x, you may have seen this error or heard a complaint from customer that when a new VM deployed, powering it on caused this error:

“The operation could not be performed, because there are insufficient memory resources” also “The available Memory resources in the parent resource pool are insufficient for the operation.”

This error might seem natural and you might suspect to the allocations of VDC but if the organization VDC is created using Allocation Pool model, the story is different. You sum up the memory assigned to all VMs and the total amount might be less than allocated amount in VDC. Most likely, it is because of the amount set in “Memory resources guaranteed” field of VDC. In fact, by default this is set to 20% and this value is the minimum number you can set. Since VMware reserves this amount of Memory, you should add it to the total amount (sum of all VMs) of RAM calculated before and then compare it to “Memory allocation”  that should be less or you will encounter the mentioned error message.

resource_alloc

So, to prevent this error, you must be more generous in assigning “Memory allocated” value of VDC because reducing “Memory resources guaranteed” less than 20% is not possible!

VMware vCloud Windows Customization Requirements

Sometimes you may notice that your customization of a VM fails when you provision VM from template or import it from vSphere; for example Computer Name may not be changed or IP address can not be assigned.

There are a couple of documents about troubleshooting guest operating system customization in VMware kb: for vCloud Director and vCenter. But none of them worked in my specific case, so I’m sharing something important in Windows OS’s. This hint will be useful especially when you see this error in: C:\Windows\Temp\vmware-inc\guestcust.Log:
“Command Execution failed with exist code: 1, output: ‘The service can not be started.’ ”

Since Windows administrators tend to disable some unnecessary services to harden security, we should know which services are necessary for VMware, if there is any. In fact, a number of Windows services should be enabled and started so that VMware customization works properly.  The necessary services are:

  • DNS Client
  • DHCP Client
  • Workstation
  • TCP/IP NetBIOS Helper

So, if you face the same issue, besides viewing Logs on VM, check these services as well.

vCloud Automation Center Installation – 1

Installing VMware vCloud Automation Center is strongly recommended for the beautiful things that administrators or tenants can do. An example is deploying popular big data clusters using a very simple procedure (I will post a how-to soon for this). There is a perfect and comprehensive 7-part installation, configuration manual written by Kenny Coleman which can be found here.
So, if you didn’t deploy vCAC in your management environment yet, install and you will enjoy it!

p.s – I found Part 3 (Installing IAAS) of this guide the most difficult one. There are some hints that I would like to add:

  • To ease installation, don’t use external MS SQL server. Instead, install SQL Express 2012 on the same Windows machine (IAAS and Model Manager Server).
  • Make sure that DNS settings are correct and IAAS Server FQDN can be resolved.
  • If you don’t use Active Directory, YOU MUST specify domain name in Primary DNS suffix of System Properties to make computer full name like its FQDN. It’s very important that in Step 8, Current Server filled automatically with FQDN and not Stand-Alone Server name. Domain should be there. Or you will face with an error (in Logs) like:
    “Building Project “C:\Program Files (x86)\VMware\vCAC\Server\Model Manager Data\DeployRepository.xml” (VARegistrationFinalSteps target(s)) — FAILED.
    Build FAILED.
    Authentication issue
    ……
    this error occurs when either the username or password supplied to iis is invalid
    …..

vCloud Public Console Proxy IP Address

You may have noticed that vCloud Director uses 2 important IP addresses to provide public access to tenants/users. One is the well-known front-end VCD IP address which is access to web portal for managing the organization vDC (also known as HTTP access) and second one provides remote access to virtual console of VM which is in fact resided on ESXi server cluster (known as VRMC access), this latter one is sort of more back-end because it’s coming from ESXi server which never should be exposed to public! So, vCloud Director actually tunnels Remote Console communications between ESXi servers and users through a proxy agent on port 443. Apparently, the proxy service runs on vCloud Director machine. That’s why an extra IP is needed on vCloud Director. This IP address is also specified in initial setup but it can be changed later (of course everything can be changed!).

So, when you want to open up vCloud Director for public users, you should pay enough attention to VRMC IP address and port. If you  have to do NAT through your firewall you should specify a different IP for VRMC and introduce the public IP/URL to vCloud Director in administration web panel. See the picture below:

Also, port 443 should be opened for this public IP on the firewall.

If you need more information about publicizing the whole vCloud Director, I found this excellent blog post about this topic, although it’s very useful for a general architecture of vCD deployment:

Add a Datastore in vCloud Director 5.5

As you may know, vCloud Director 5.1 recognized ‘Storage Profiles’ instead of recognizing datastore or datastore clusters directly. In VCD 5.5, ‘Storage Profiles’ are changed to ‘Storage Policies’ .This change of concept and term from ‘Profiles’ to ‘Policies’ may make some issues when you want to add a Datastore and utilize it in vCloud Director 5.5. As a matter of fact, if you (like me) are used to vSphere Client instead of vSphere Web Client to do your tasks (because it seems faster!) you will fall into troubles and this is one of those scenarios.

The normal procedure to add a datastore to the infrastructure in order to provision it in vCloud Director 5.1 is:

  1. Add datastore to the VMware infrastructure in vCenter using VMware vSphere Client (or Web Client)
  2. Assign a pre-defined ‘Storage Capability’ to datastore. If you didn’t define ‘Storage Capability’ yet see link above to see how to create and enable it. This ‘Storage Capability’ is assigned to a ‘Storage Policy’ itself! I know it’s confusing! and ‘Storage Profiles’ are known in vCloud Director through connected vCenter. An important bug is mentioned here that you should assign a ‘Storage Capability’ to your datastore before adding it to a datastore cluster. Keep this in mind if you are just adding datastore to an existing ‘Storage Profile’.
  3. So, if you didn’t add ‘Storage Profile’ in vCloud Director before, you should do so now; if it’s introduced before you can right-click on your vCenter in vCloud Director (‘Manage and Monitor’) and ‘Refresh Storage Profiles’. It’s not necessary, it will be done automatically after some time.

The regular procedure and storage terms in vSphere/VCD 5.5 is different than 5.1. The point is vSphere Client 5.5 (not Web Client) is still using the old terms and if you add datastore using vSphere Client 5.5, datastore cluster will disappear in vCloud Director and Provider VDC’s will not have access to datastores! No need to say it’s not a pleasant situation! So, to utilize a new datastore in vCloud Director 5.5 follow the procedure explained here. As I said, it’s very important to use vSphere Web Client to add datastore to infrastructure. In brief:

  1. Add datastore to the VMware infrastructure in vCenter
  2. The good thing in vSphere 5.5 is that there is no ‘Storage Capability’ which is less confusing (it’s confusing because you expect to find a very complicated concept but when you use it you see that it’s nothing more than a label!) and it’s replaced by a simple word: ‘tag’. So, if you already defined a ‘Storage Policy’ with a known ‘tag’, the only thing is to ‘Assign  Tag’ to datastore by right-clicking on it. If you have upgraded infrastructure from 5.1, storage capabilities are already converted to tags.
  3. Right-click on your vCenter in vCloud Director (‘Manage and Monitor’) and ‘Refresh Storage Policies’. As you see storage profile is replaced with storage policy in VCD 5.5.

DV portgroup is not found in the inventory after creation

Just for documentation that may help somebody else. The other day, I’ve got the following error when I intended to create an Organization VDC network in vCloud Director:

“Cannot deploy organization VDC network  (4a0c24d9-9f10-442b-8cb0-0fa9e8ccf0c8)
– com.vmware.ssdc.util.LMException: DV portgroup dvs.VCDVSNet1-a82df557-76db-4e37-9de3-53f4167db22c is not found in the inventory after creation
– DV portgroup dvs.VCDVSNet1-a82df557-76db-4e37-9de3-53f4167db22c is not found in the inventory after creation”

Normally vShield manager is the first thing I would suspect, but in this case it wasn’t the cause. I looked into many things and everything seemed normal. By the way, vCD Director is a software solution and unexpected things may happen. I thought restarting vCloud Director service is a good idea and yes, it worked! Therefore, the solution for me was running this command in vCloud Director server:

service vmware-vcd restart

Of course it may not fix the issue in your case. If it doesn’t help, look into VCD Cells page in cloud administrator console to see if there is an error message that maybe useful. Also, reconnecting vCenter is recommended.

p.s – VMware technical support told me to look into vCenter to monitor its CPU and memory usage. That’s a good point to be considered if everything else is okay and it’s not a configuration issue I believe. Also, database server may be slow not being able to return the result of a query in an acceptable time.

Extra Large Edge Gateway in vCloud Director 5.5

Sometimes you feel like implementing a powerful edge gateway in your VMware vCloud environment. Let’s say you have heavy load and you plan to use load balancer capability of edge gateway in VMware vCloud Director. Unfortunately hardware configuration of vShield edge gateways are not customizable through vCloud Director and changing hardware configuration through vCenter is not possible. Also, hardware templates for use as edge gateways are limited in terms of processing power and memory. There are 3 pre-defined hardware configurations in vCloud Director 5.5: Compact, Full and Full-4. Full-4 type is a new one in vCloud 5.5 and as I know Full gateways in vCloud 5 are upgraded to Full-4 automatically when you upgrade the infrastructure to version 5.5. In brief, hardware configurations for vShield edge gateways are as follows:

  • Compact: 1 * vCPU and 256 MB of Memory – 64000 concurrent sessions
  • Full: 2 * vCPU and 1024 MB of Memory – 1,000,000 concurrent sessions
  • Full-4 (new in vCloud 5.5): 4 * vCPU and 1024 MB of Memory

I didn’t find updated detailed information for vCloud 5.5 but you can see more details about edge gateway specifications and performance parameters in vCloud Director 5.1 at this useful link.
As you see, hardware power is limited especially in regards to memory. So, in case you need a memory intensive edge gateway (Load balancer is a good example) you need to upgrade the hardware. Although there is no direct method to this through vCloud Director admin panel, the fact is that vShield Manager has this capability to implement x-large gateways. x-large edge gateway in VMware Networking and Security 5.5 has 4 * vCPU and 8GB of Memory that is quite considerable.

As VMware recommended, if you need to upgrade hardware configuration of an edge gateway in vCloud Director, you can use vShield portal to do so. As it’s shown in the following picture, login to vShield Manager admin panel, choose your Datacenter, on ‘Network Virtualization’ tab select ‘Edges’, click on the edge gateway you intend to upgrade and finally from Actions menu choose: ‘Convert to X-Large’. That’s all.

Just keep in mind that in the picture above login to vShield Manager is done via vCenter. So, the ‘Network Virtualization’ tab shown in the figure is within vCenter; however it’s a bit difficult to get into vShield Manager through vCenter and I faced some weird errors about Acrobot Adobe! As a result, I recommend to use vShield Manager directly to avoid such issues.