Implementing SSO is very useful when teams grow. Okta is well known as Identity provider and in specific for SSO. Elastic is also well known for their great products including Elasticsearch and Kibana! Elastic started its hosted service (Elastic Cloud) and they added nice features such as Hot/Warm deployments which made it popular. They both have good documentation but when it comes to this specific integration, things are not clear. I spent some time and communicated with support on both sides and in this post I will show how to integrate Kibana hosted by Elastic Cloud with Okta as IdP, Step by Step:
- First step is to configure Okta side to get the Assertion XML. Go to Okta Admin page and Add an application. Choose a SAML 2.0 App. Then you have to specify some basic information such as App name and Logo. Next is SAML Settings which is the important part. In specific the following parameters should be defined:
- Single sign on URL: for Elastic cloud the format is:
https://YOUR_CLUSTER_ADDRESS:9243/api/security/v1/saml
please note that/api/security/v1/samlis fixed (at least by the time this post is written) - Audience URI (SP Entity ID): This is exactly the URL of your Kibana in Elastic Cloud but please don’t forget
/at the end:https://YOUR_CLUSTER_ADDRESS:9243/ - Name ID Format: depends on your Okta usernames. In my case it’s
EmailAddress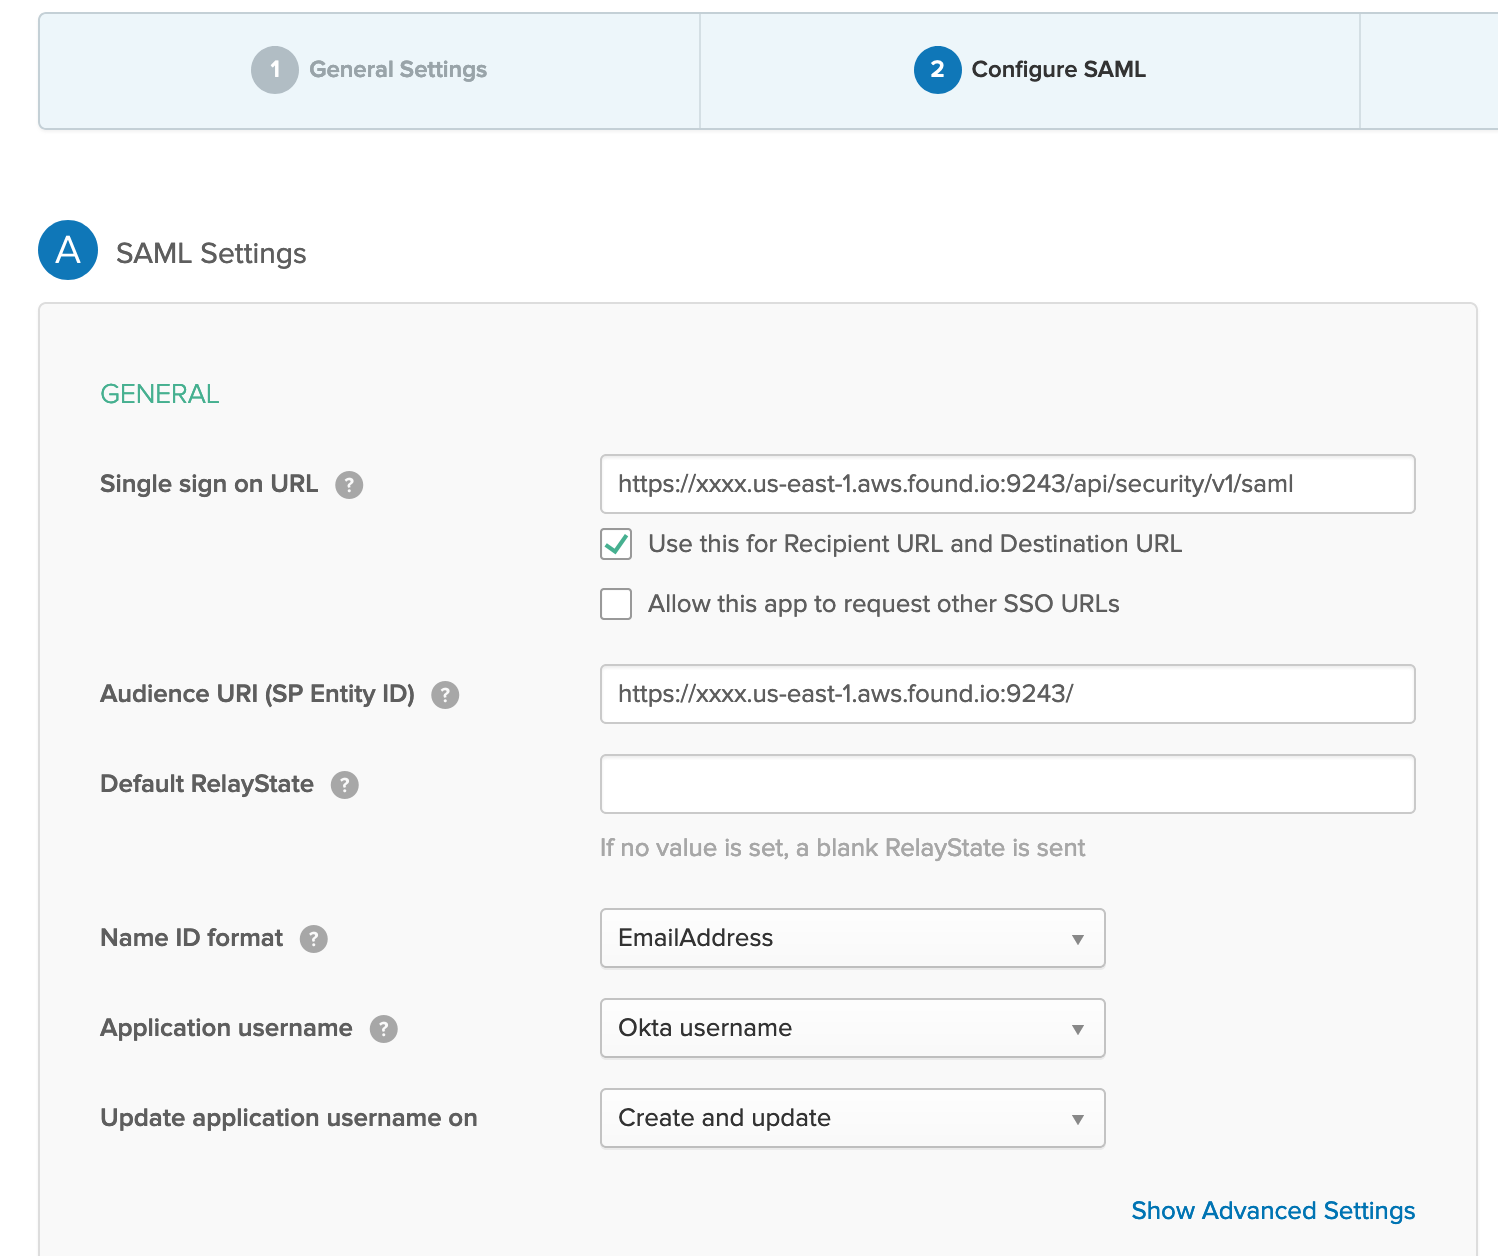
- Group Attribute Statements: This is very important for granular Access management and role mapping in Kibana.
For theNamespecifygroups. This is important and then for better management you can specify a filter to map groups that containkibana(as an example). It will filter groups that you created in Okta directory and will help in mapping with Kibana/Elasticsearch x-pack roles. for example you can create a group in Okta with a name likekibana_adminsand add Okta users that you want to havesuperuserprivilege in Elasticsearch to this group. We will come back to this mapping later.
- It’s almost done now at Okta side. You can review and check the guide which is given by Okta about how to introduce Assertion and Metadata to service provider (Kibana/Elasticsearch)
- Single sign on URL: for Elastic cloud the format is:
- in Next step is configuring Elasticsearch. The main guide to do this on Elastic Cloud is the following:
https://www.elastic.co/guide/en/cloud/current/ec-securing-clusters-SAML.html
You can editelasticsearch.ymlby going to Cloud Console and choosing your deployment and thenEditoption and then `User Setting Override`:
The following values are important:- attributes.principal: you can see the explanation what this is but in case of Okta, apparently its value should be
nameid - attributes.groups: It should be in line with item 4 of previous step (Okta) but I recommend to use exactly
groupsas value - idp.metadata.path: It is something like the following:
https://YOURCOMPANY.okta.com/app/OKTA_APP_ID/sso/saml/metadata
but you can get it by visiting Sign On configuration in Okta. In the following picture see the link pointing to Metadata in blue at the bottom.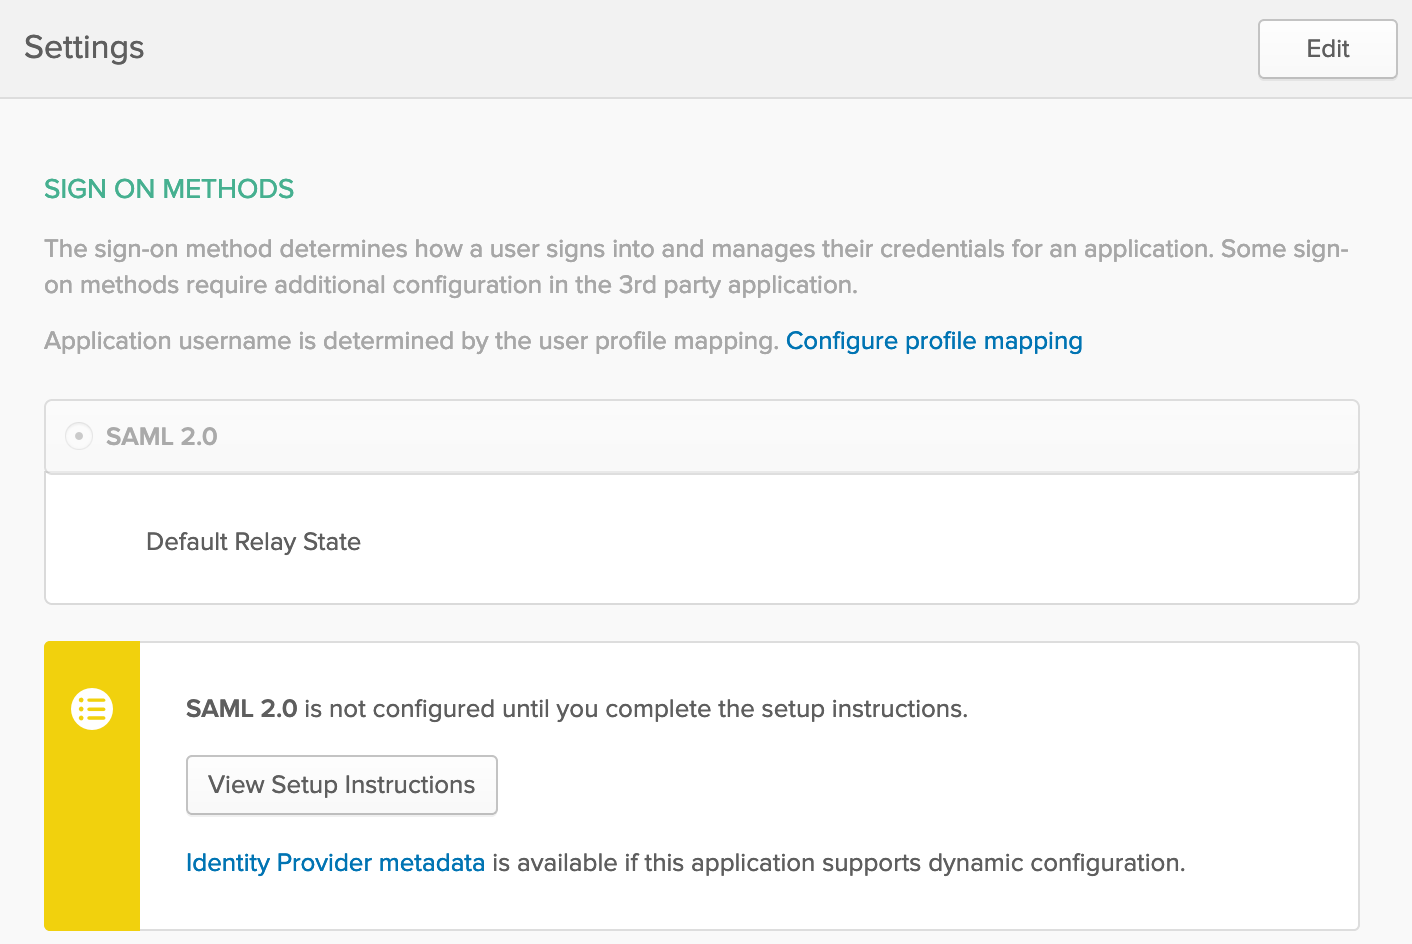
- idp.entity_id: If you check Setup Instructions in Sign On configuration (picture above), it’s mentioned but it looks like the following:
http://www.okta.com/OKTA_APP_ID - sp.entity_id: As the guide says it should be:
"KIBANA_ENDPOINT_URL/"but keep in mind that it should align with item 2 of previous step in Okta and again, don’t forget/🙂 - The rest is straight forward and you won’t miss them
- attributes.principal: you can see the explanation what this is but in case of Okta, apparently its value should be
- Tips:
- This is very important and took me and Elastic support a lot of time to troubleshoot: If you have Hot and Warm nodes, you should apply the configuration to both type of nodes and there are separate
elasticsearch.ymlfiles on Cloud Console - The value for
attributes.principalshould be exactlynameidandnameid:persistentwon’t work. - You must use the SAML realm name
cloud-saml(mentioned in the guide)
- This is very important and took me and Elastic support a lot of time to troubleshoot: If you have Hot and Warm nodes, you should apply the configuration to both type of nodes and there are separate
- Next step is to do role mapping. You can read about it here:
https://www.elastic.co/guide/en/elastic-stack-overview/7.3/saml-role-mapping.html
So far we setup Okta to send some metadata along with the auth response and using these API’s we have to map the groups in Okta with Roles in ElasticSearch. For example I have 2 groups in Okta named:kibana_operatorsandkibana_admins. using the following mappings I map them toMonitorandsuperuserroles in ElasticSearch:
######## Role Mapping 1 - Operators #######
PUT /_security/role_mapping/saml-kibana-operators
{
  "roles": [ "Monitor" ],
  "enabled": true,
  "rules": { "all" : [
      { "field": { "realm.name": "cloud-saml" } },
      { "field": { "groups": "kibana_operators" } }
  ]},
  "metadata": { "version": 1 }
}

######## Role Mapping 2 - Admins #######
PUT /_security/role_mapping/saml-kibana-admins
{
   "enabled": true,
    "roles": [ "superuser" ],
    "rules": { "all" : [
        { "field": { "realm.name": "cloud-saml" } },
        { "field": { "groups": "kibana_admins" } }
    ]},
    "metadata": { "version": 1 }
}
- Finally, you have to configure Kibana to use SAML as authentication mechanism. This step is straightforward as mentioned as Step 6 of this guide. Just Edit
kibana.ymlby usingUser setting Overridesin Elastic Cloud Console and specify the values accordingly.
And that’s it! Now you should be able to create users in Okta and add them to appropriate group to enable them to access Kibana!

Hi Mehdi!
Nice post ! Thanks for taking the time to writing this down. If you don’t mind, I’ll make a few clarifying comments in case this is helpful for future readers 🙂
1.
> Name ID Format: depends on your Okta usernames. In my case it’s EmailAddress
The NameID Format identifiers are described in section 8.3 of the Core SAML 2 spec in http://docs.oasis-open.org/security/saml/v2.0/saml-core-2.0-os.pdf and are meant to be an indication of what the NameID value is. The fact that your usernames in Okta are email addresses, doesn’t necessarily mean that you need to select EmailAddress ( which corresponds to urn:oasis:names:tc:SAML:1.1:nameid-format:emailAddress ) – but it’s a good practice !
2.
> Audience URI (SP Entity ID): This is exactly the URL of your Kibana in Elastic Cloud but please don’t forget / at the end:
https://YOUR_CLUSTER_ADDRESS:9243/
and
> sp.entity_id: As the guide says it should be: “KIBANA_ENDPOINT_URL/” but keep in mind that it should align with item 2 of previous step in Okta and again, don’t forget / 🙂
The important thing here is that these two match ! It is common good practice to use the FQDN where the Service Provider is available as the value for the Service Provider’s Entity ID (and this is why we suggest that in the documentation) but it is by no means mandatory. You could add “my-random-string-here” in both and it would be fine. These two are compared as strings and need to match exactly !
3.
> attributes.principal: you can see the explanation what this is but in case of Okta, apparently its value should be nameid
and
> The value for attributes.principal should be exactly nameid and nameid:persistent won’t work.
This is described in more detail in https://www.elastic.co/guide/en/elastic-stack-overview/current/saml-guide-authentication.html#saml-attribute-mapping.
In short, nameid:persistent did not work for you because you have configured Okta to use an EmailAddress NameID Format. A simple rule of thumb without the need to go into much SAML detail is:
– If you set up Okta to use a Persistent NameID Format, then in Elasticsearch you can set attributes.principal: nameid:persistent
– If you set up Okta to use any other NameID Format, then set attributes.principal: nameid
Hope this helps !
Thanks a lot for clarifications Ioannis!