Mixing 802.1Q and 802.1ad in Linux

When it comes to networking, Linux kernel is really superior over Windows. Some will ask why? Apart from performance point of view, there are some great features in Linux that can not be deployed in Windows easily. To give an example, let’s think about 2 important features: support for VLAN and trunking (802.1q) and NIC teaming or Link aggregation (802.1ad).

As far as I know, Windows kernel doesn’t support 802.1q and it all depends on NIC driver and for 802.1ad Windows support starts from Windows 2012 which means it’s too young! and who knows how it works! but both are prolonged features in Linux kernel.

And these features are really useful; for example when one single computer needs to be part of different VLAN’s it needs to be connected to a trunk port on the switch; therefore should understand VLAN tags and decapsulate packets. This single computer can even act as a router between different VLAN segments. Connecting to different VLANs means more traffic, so it’s not a bad idea to double (as an example) its bandwidth by aggregating (bonding) two NIC’s to improve performance. I’m providing 2 links to show how to implement 802.1q and 802.1ad in a single Linux machine with 2 or more NIC’s:

And to have an idea about combining these 2 features, see:

VMware vCD Guest Customization for Debian

One of the great features in vCloud Director is client’s capability to customize general specifications of a VM. Specifications like Hostname and more importantly IP address(es). Customer can even have some scripts for more advanced customizations like joining to a domain, … All these depend on ‘Guest OS Customization’ feature that should be enabled on a VM. Not all the operating systems support ‘Guest OS Customization’. For a list of supported OS’s in vCD 5.x see these links:

Supported guest operating systems in vCloud Director 5.5
– Supported guest operating systems in vCloud Director 5.1

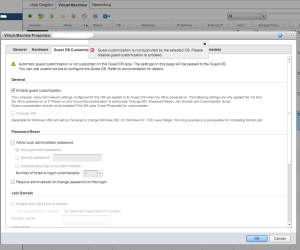
As you can see, there is no support for Debian Linux! What a pity! If you deploy a Debian and want to change its IP through VM Properties in vCD portal, it will give you an error:

“Guest customization is not supported by the selected OS. Please disable guest customization to proceed.”

Debian_custom

Debian is a great OS and many clients may get disappointed! But fortunately, there is a simple work-around for it: change the Operating System type to: Other Linux and Guest Customization will be fine! Of course, try to choose the closest kernel version, for example choose ‘Other 2.6.x Linux (64-bit)’ for a Debian wheezy with kernel 3.2.0-amd64.

Debian_custom2

By this change, modifying Hostname or assigning IP addresses, Gateway, DNS to Debian NICs would be possible like any other supported OS.

Enlarge Linux Partition to sizes Larger Than 2TB

If you have partitioned a disk using ‘fdisk’, most probably the partition table is using ‘MBR‘. Nowadays, one important disadvantage of MBR is the lack of supporting larger than 2 TB partitions. So, if you want to extend a partition while disk is using MBR, first the disk partition table needs to be converted to ‘GPT‘. To find difference between MBR and GPT see here as well.

Generally, to resize a partition, it needs to be deleted and re-created using new size or end sector. A good general approach to enlarge a partition while not losing data is explained in this link. You can follow this how-to with a slight but important difference: instead of using ‘fdisk’, ‘gptdisk’ or ‘gdisk’ should be used. ‘gdisk’ supports GPT and if you use the existing specifications (first sector) for new partition, there would be no data loss. When doing conversion, a warning will be triggered:

THIS OPERATION IS POTENTIALLY DESTRUCTIVE! Exit by typing 'q' if you don't want to convert your MBR partitions to GPT format!

But it’s okay! Don’t worry and continue. Then, it will ask for partition type, because the current partition type is based on MBR partition table. You can choose ‘ef00’ which is ‘EFI System’. Go ahead and create the new partition with new size, save the partition table and you are done. Then ‘resize2fs’ can be used to enlarge volume.

p.s – instead of enlarging partition, another choice (rather than MBR to GPT) is using LVM to create large logical volumes containing multiple physical volumes.

tcpkill to Kill a TCP connection!

I recently found a very useful command in Linux named ‘tcpkill’. Actually, the other day I was trying to find a way to kill a tcp connection between my server and a client. Not that it was an attack or needed firewall rule, but simply I wanted it to be killed in order to let the upper layer application to re-establish connection. There was no utility in the upper layer application to do this and it handed TCP connection management over to OS (TCP KEEPALIVE in linux kernel). So, I started looking for the solution to kill the connection.
So, the solution was easy, just issue ‘tcpkill’ command with appropriate parameters. Parameters are compliant with ‘tcpdump’ filter formats. So, if you are familiar with ‘tcpdump’ you will find it easy. For more explanation, examples see the amazing cyberciti website.

VMware vCloud Director Guest Customization Support

It’s nice to use Guest Customization feature in VMware vCloud Director 5.1. Some operations like IP assignment to VM’s created by template is much easier if Guest Customization is supported in the OS of virtual machine. Not all the OS’s support this feature. For a complete list of supported OS’s, see here.
Apparently, you need to install VMware-Tools on the base VM (to be used as template in vCloud Director). For a Linux machine, two important things should be considered:

  • For VMware Tools to be installed automatically, you need X Server. So, if you are working in text mode, you have to do it manually. VMware Tools is mounted on cdrom and then you should issue ‘vmware-install.pl’
  • Never use VMware Tools packages provided by specific Linux distribution. Install by mounting VMware Tools in vCenter.

Simple SMTP Relay in Cloud

In a cloud environment, there are many cases that a send-only mail server (smtp relay) would be required. Apart from cloud, in other applications like monitoring systems (to send alerts, cron reports, …) having a mail relay is beneficial. Exim (exim4) in Linux systems is a simple, good and safe candidate.

Well, if you want to have exim4 in your cloud, first install a VM with light-weight linux system in your Infrastructure cluster. I’m writing this short guide considering Debian/Ubuntu as linux VM. And then most probably, you would like to connect this VM to management network. The rest is easy, here comes the required steps:

1) Install lightweight exim4. Exim4 by itself is simple but exim4-daemon-light is a very basic mail server with all our required features, lacking advanced, unnecessary (in this case) features like LDAP, MySQL authentication.

  • apt-get install exim4-daemon-light

2) Edit configuration file, by default is /etc/exim4/update-exim4.conf

  • 2-1) change dc_local_interfaces variable to add IP address of the NIC attached to your management network. By default, exim allows only local machine (loopback address, 127.0.0.1) to send email. You should add management IP address to be able to listen to other machines in management networks.  Example:
    dc_local_interfaces = ‘127.0.0.1 ; 192.168.50.150’

  • 2-2) change dc_relay_nets variable to restrict the machines which are capable of sending email through this mail relay server. Apparently, this should be the network address of your management network. By default, it is empty that increases the risk of being used by other unknown machines but you like to enable only machines in management network to use this mail relay server. Example:
    dc_relay_nets = ‘192.168.50.0/24’
  • 2-3) change dc_relay_domains parameter to increase security. Maybe you want to restrict the domains of recipients; because this mail relay server is being used for internal purposes (sending alerts, cron reports, …) your recipients are known and most probably they will use your organization email. It’s a good idea to restrict recipients to increase security. so, let’s do this:
    dc_relay_domains = ‘example.com’

3) restart exim service:

  • /etc/init.d/exim4 restart

That’s it. Enjoy your relay server.